Resource
An all-in-one cloud platform packed together in one simple web application you don’t need a manual to run. Let us walk you through some of the main components that make prompt integrated so easy to use.
Dashboard
Prompt. Integrated is an elegantly designed online invoicing and payroll software that caters to all your business needs without overwhelming you with unnecessary features. This all-in-one web application seamlessly integrates invoicing, payroll, estimates, client management, staff, contractors, and time tracking, making it a comprehensive solution for businesses of all sizes.


Invoice
Creating invoices from scratch or generating them from existing projects has never been easier. With just a click of a button, you can send out invoices to your clients, ensuring a seamless and efficient billing process. Once an invoice is sent, your clients will be instantly notified via e-mail, keeping them informed up-to-date. This steamlined approach not only saves times but also enhances communication and helps maintain a professional relationship with your clients.
Sign up for a Prompt-integrated account and send your first invoice in minutes. Set up auto-reminders and connect with MTN MoMo or Payswitch to help ensure you get paid on time.
To create an invoice:
-
Select a Client from your client list.
-
Enter the Invoice Subject and PO Number.
-
Select a Project.
-
The Invoice Number will be generated automatically.
-
Choose your preferred Currency.
-
Select the Invoice Date and Due Date from the calendar

 Add an item, select the quantity and unit price, and let the system calculate the total.
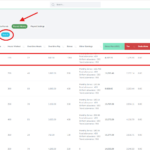
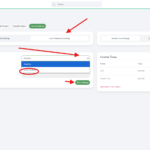
 Click Create Invoice, and your invoice will be ready to send within a few seconds. You can find the created invoice in the invoice overview. Click the Send icon to send it; a confirmation message will appear indicating the invoice was successfully sent. Use the other icons to navigate through the invoice.
Click Create Invoice, and your invoice will be ready to send within a few seconds. You can find the created invoice in the invoice overview. Click the Send icon to send it; a confirmation message will appear indicating the invoice was successfully sent. Use the other icons to navigate through the invoice.
The client receives an e-mail verificaiton with pay now button to pay. 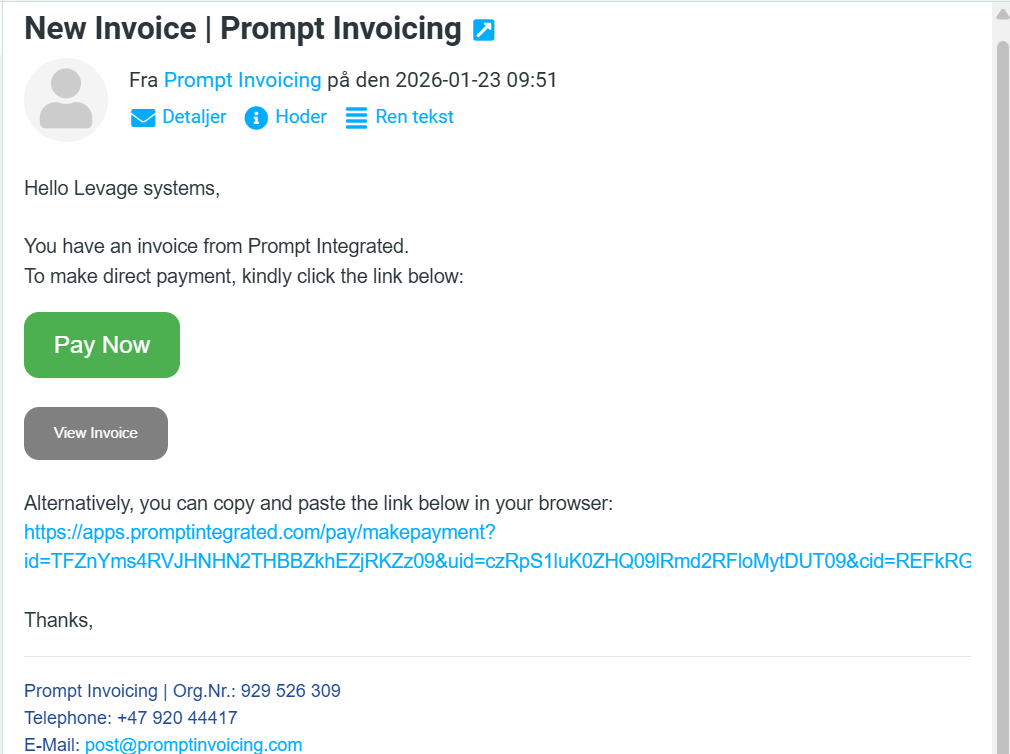
The clients pays for the invoice by clicking on the pay now button and will be redirected to a payment portal. In some few minutes you’ll receive payment to your MoMo account 
In this video, we walk you through how clients can easily create and pay for an invoice on Prompt Integrated. From selecting a registered client and project to generating an invoice with automatic calculations, you’ll see the full step-by-step process in action.
The tutorial also demonstrates how clients receive the invoice via email, access the “Pay Now” option, and complete payment securely using MTN MoMo. By the end of the video, you’ll understand how simple, fast, and convenient it is to manage invoices and payments within Prompt Integrated.
Expenses
Prompt Integrated’s powerful and simple expense tracker revolutionizes the way you manage your business expenses. Gone are the days of rummaging through shoeboxes of receipts or wrestling with complex spreadsheets. With Prompt Integrated, you can effortlessly monitor your spending and instantly gauge your profitability. Its intuitive interface provides real-time insights, ensuring you stay on top of your finances with ease.

“Click on ‘Expense’ and select ‘New Expense.’ Then, enter the expense heading.
Choose the right name for your expense.
-
Describe the expense.
-
Select a client from the client list.
-
Choose the project you’re working on.
-
Enter the currency and amount.
-
Attach a receipt for record keeping.

Add an attachment to get organized and click on create expense.
To create an expense in Prompt Integrated, go to the main dashboard and click on Expense. This will take you to the Expense Overview, where all recorded expenses and their corresponding receipts are neatly organized.
Click on New Expense to begin. Enter the expense heading — in this example, the heading is Water Bill. Add a description (also “Water Bill” in our case), then select the relevant project and client. The client is Levage Systems, and the project is Construction of Swimming Pool.
Next, choose Ghana Cedi (GHS) as the currency and enter 500 GHS as the expense amount. You also have the option to upload a receipt as an attachment.
Once all details are completed, click Create Expense to finalize and record the expense.
Thanks for watching.

Estimates
Prompt integrated streamlines your entire engagement cycle by seamlessly handling both estimates and invoices. This comprehensive approach ensures that clients have a clear understanding of costs from the outset, fostering transparency and trust. By providing detailed estimates upfront and following up with precise invoicing, Prompt integrated eliminates confusion and reduces the likelihood of disputes. This clarity and efficiency give clients the confidence to move forward with projects, knowing that their financial expectations will be met without surprises.
Go to estimate to find overview of your estimates. and click on new estimate to get started.
 Click on
-
Click on New Estimate.
-
Select a Client.
-
Enter the Estimate Subject.
-
Enter the Estimate Number.
-
Select the Prepared Date.
-
Select the Expiry Date.
-
Choose the Currency.
-
Enter a Description.

-
Click on Add Item.
-
Describe your Product or Service.
-
Enter the Quantity, Unit Price, and Line Total.
-
Enter the Rate and Discount.
-
Click Create Estimate.
• Click on Estimates.
• Click the + (plus) sign to access the estimate options.
• Select Edit.
• In the Edit screen, click the Convert to Invoice button (highlighted in turquoise).
• Once clicked, an invoice will be generated automatically.
• The newly created invoice will also be recorded in your Invoice History for easy tracking and management.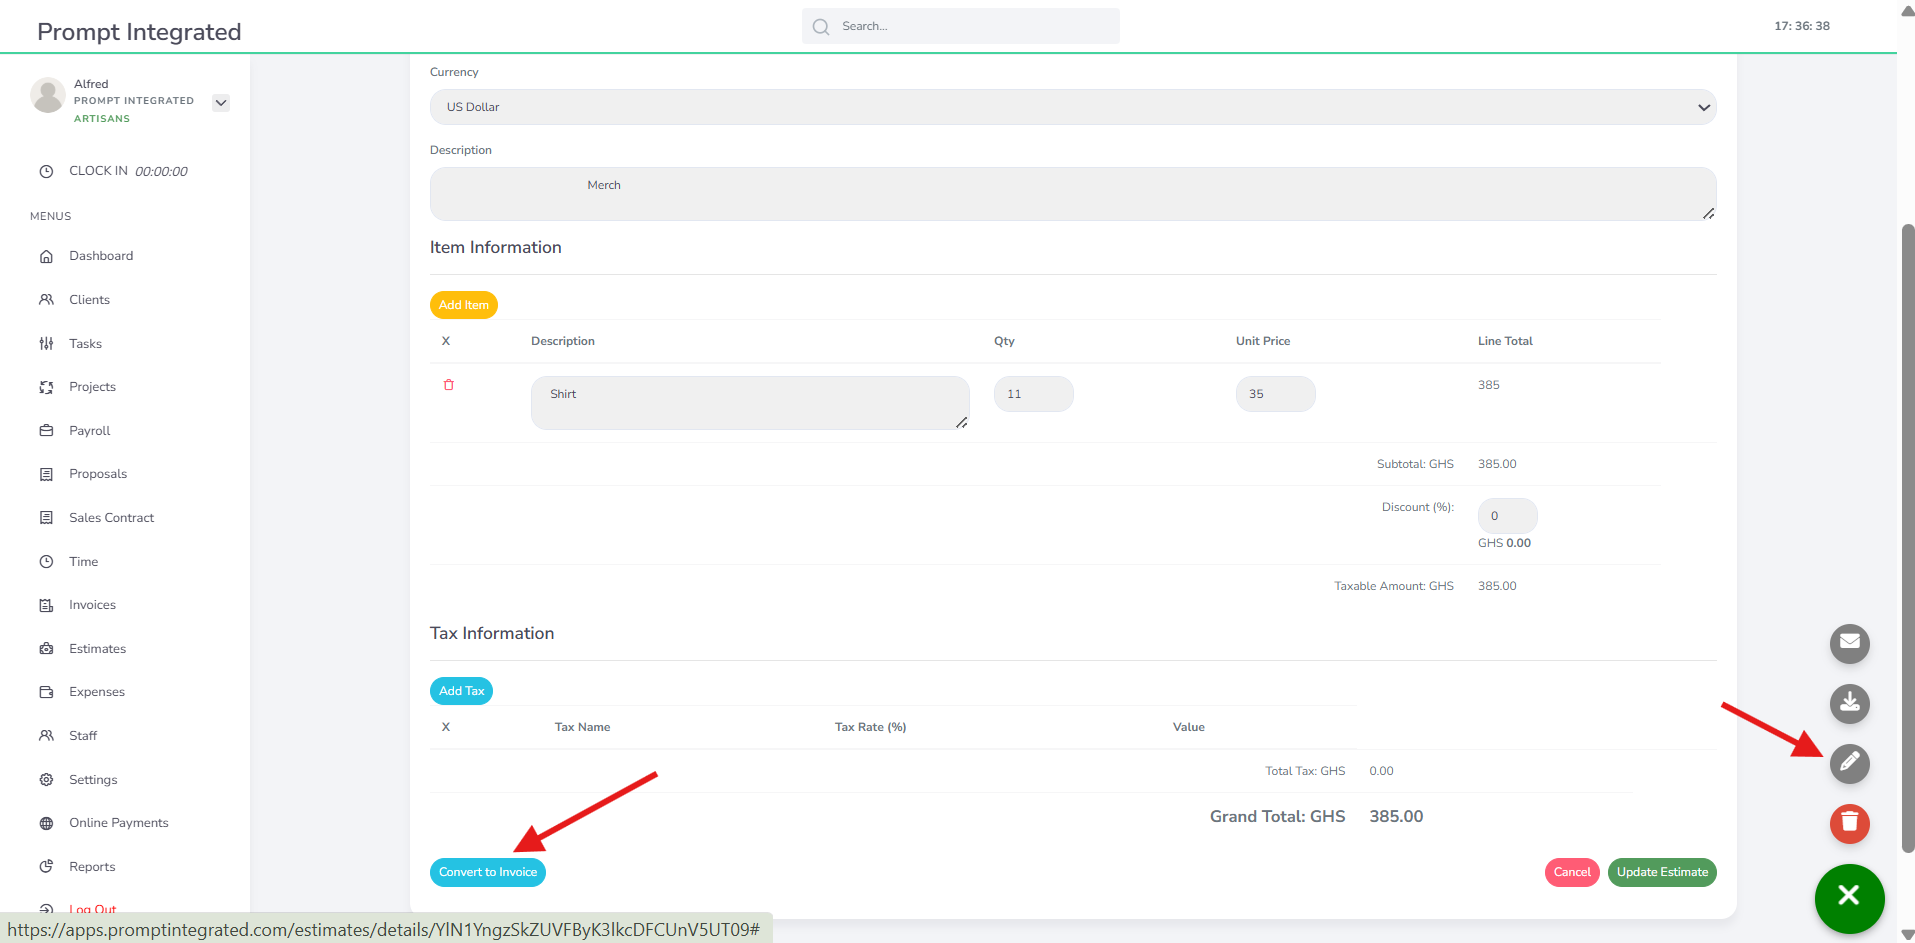
click on the plus icon for extra options to send or edit or delete.
Clients
Each staff user and client contact has a dedicated profile page that offers an overview of their interactions and contributions. The activity log tracks past projects and comments, providing a history of engagement. This log aids in monitoring project evolution, identifying collaboration patterns, and ensuring communication transparency. Detailed records foster accountability and improve project management efficiency, highlighting successes and areas for improvement.

Click on new client to add new client, 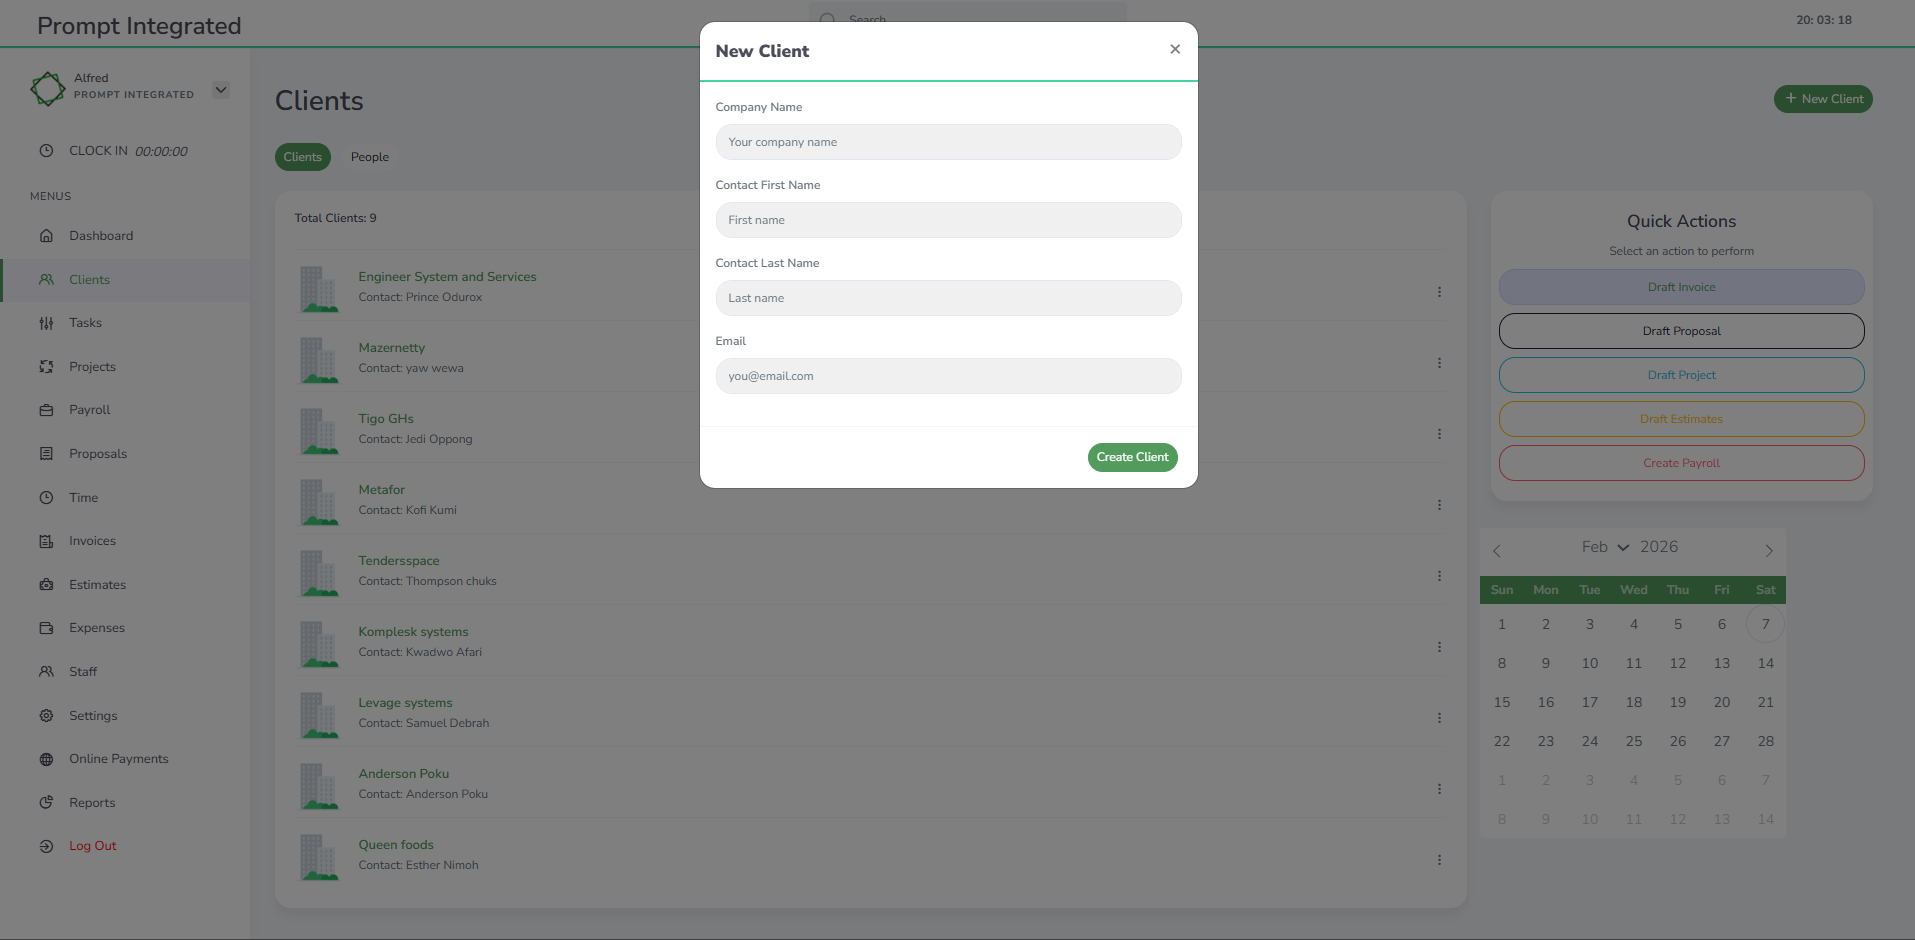
-
Enter the Company Name.
-
Enter the Contact First Name.
-
Enter the Contact Last Name.
-
Enter the Email Address.
-
Click Create Client to register the client.

This video explains how to create a client in Prompt Integrated

Proposals
Prompt integrated is a crucial aspect of establishing strong client relationships, and it often begins with the use of proposals, also known as “Engagement Letters.” These documents clearly outline the scope of work, terms, and expectations, ensuring that both parties are on the same page. By securing agreements through digital signatures, businesses can streamline the contracting process, making it more efficient and convenient for clients. This not only helps in setting a professional tone but also reduces the likelihood of misunderstandings or disputes down the line, fostering trust and long-term collaboration.
Click Proposal to get started. A default template is provided to help you begin quickly. You can customise it by editing the content, adding sections, and inserting images to suit your needs.
Select a client from your client list and start preparing the proposal. Add a subject, proposal date, and amount, then structure and customise the proposal to fit your needs
-
- build structure
-

- Proposal structure
-

- Send and edit proposal
Add one or more attachments, such as a PDF, and get the proposal ready to send for signing.
Sign the proposal, save it, and send it to your prospective client.
Go to the main dashboard and click on Proposals to begin. This will redirect you to the Proposals Overview page. Please note that all clients must be registered under the Clients section before they can appear in the client list.
Start by selecting a client. In our example, the client is Levage Systems. Enter the proposal subject — in this case, Installation. Then choose the proposal date and enter the proposal amount, which is 4,700 GHS in this example.
You can customize the proposal template headings and structure to suit your needs.
If necessary, upload any supporting documents as attachments. These will appear on the final proposal. You can then sign the proposal using the built-in e-signature feature and save it. Once saved, the proposal will be generated using your company’s selected brand colors — for example, green, as chosen in the Settings color picker.
Finally, click on the mail icon to send the proposal directly to your client.
Thanks for watching.
Tasks
Efficiently manage your tasks and boost productivity with our intuitive Task Management tool. Whether you’re an individual professional, a small team, or a large organization, our platform is designed to streamline your workflow and keep you on top of your projects. Our tool offers a user-friendly interface that allows you to easily prioritize tasks, set deadlines, and collaborate with team members in real-time. With features like task boards, and deadlines, you can ensure that no task falls through the cracks. Experience the ease of managing your projects with our Task Management tool and see a significant improvement in your productivity and organization.

Click task from the dashboard overview to take you task registration
-
Select a Client.
-
Choose a Project.
-
Assign the Task to an Employee.
-
Select a Due Date.
-
Choose the Status and Priority.
-
Add any relevant Attachment.
-
Click Create Task.

Click on create task to add task to a project

Time
Prompt integrated offers your team a versatile and efficient way to manage their time, whether by the month, week, or day. This flexibility ensures that planning hours in advance or tracking them retrospectively is seamless and stress-free. By providing multiple viewing modes, prompt integrated makes it easy to stay organized and maintain accurate records, ultimately improving productivity and accountability across your projects. This system not only simplifies administrative tasks but also allows your team to focus more on their core responsibilities, leading to enhanced overall performance.
Click on time from the dasboard overview to track time
-
Choose the Project you’re working on.
-
Select the Task.
-
Describe the Task.
-
Choose the Staff member.
-
Enter the Hours Worked.
-
Click Create Entry.

Click on the calender overview to select the task or the time entry you want to delete and click delete entry
To begin a time entry, go to the main dashboard and click on Time. Select the project you’re currently working on — in this example, Installation of Kitchen.
Next, choose the related task. Here, the task is Installation of Drawers and Cabinetry. Remember, every task must be linked to its corresponding project.
Add a brief description of the work completed. The staff name will automatically appear based on who is logged in. Enter the number of hours worked — in this case, 8 hours — and click Create Entry to save.
The entry will appear in the calendar-based time tracking module, making it easy to review your activities later.
If you need to edit or delete a time entry, return to the Time module, select the specific entry from the calendar view, and choose the appropriate option.

Click on clock in from the dashboard to start clocking.
After clocking in, select the project you’re working on from the list of registered projects.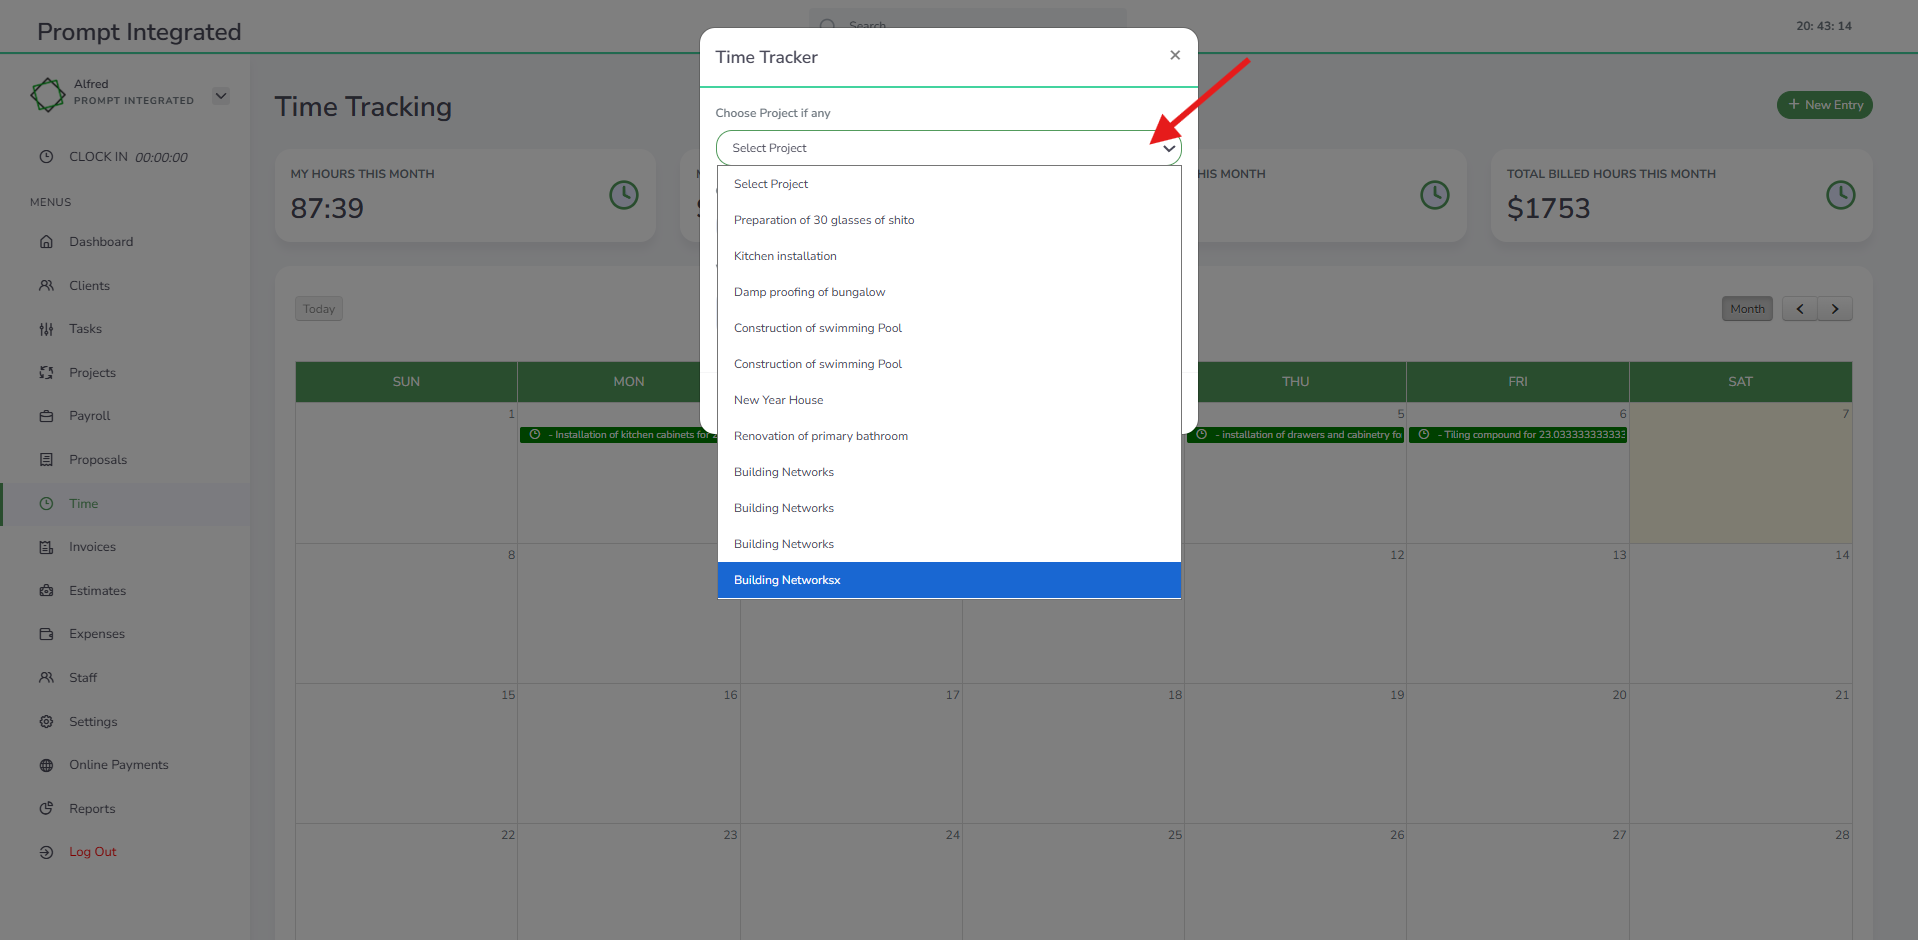
Choose task and enter what you’re working on.
After entering your task, start the timer. You can pause for a break or stop when finished, and the total hours worked will be recorded. The timer will run in the background while you work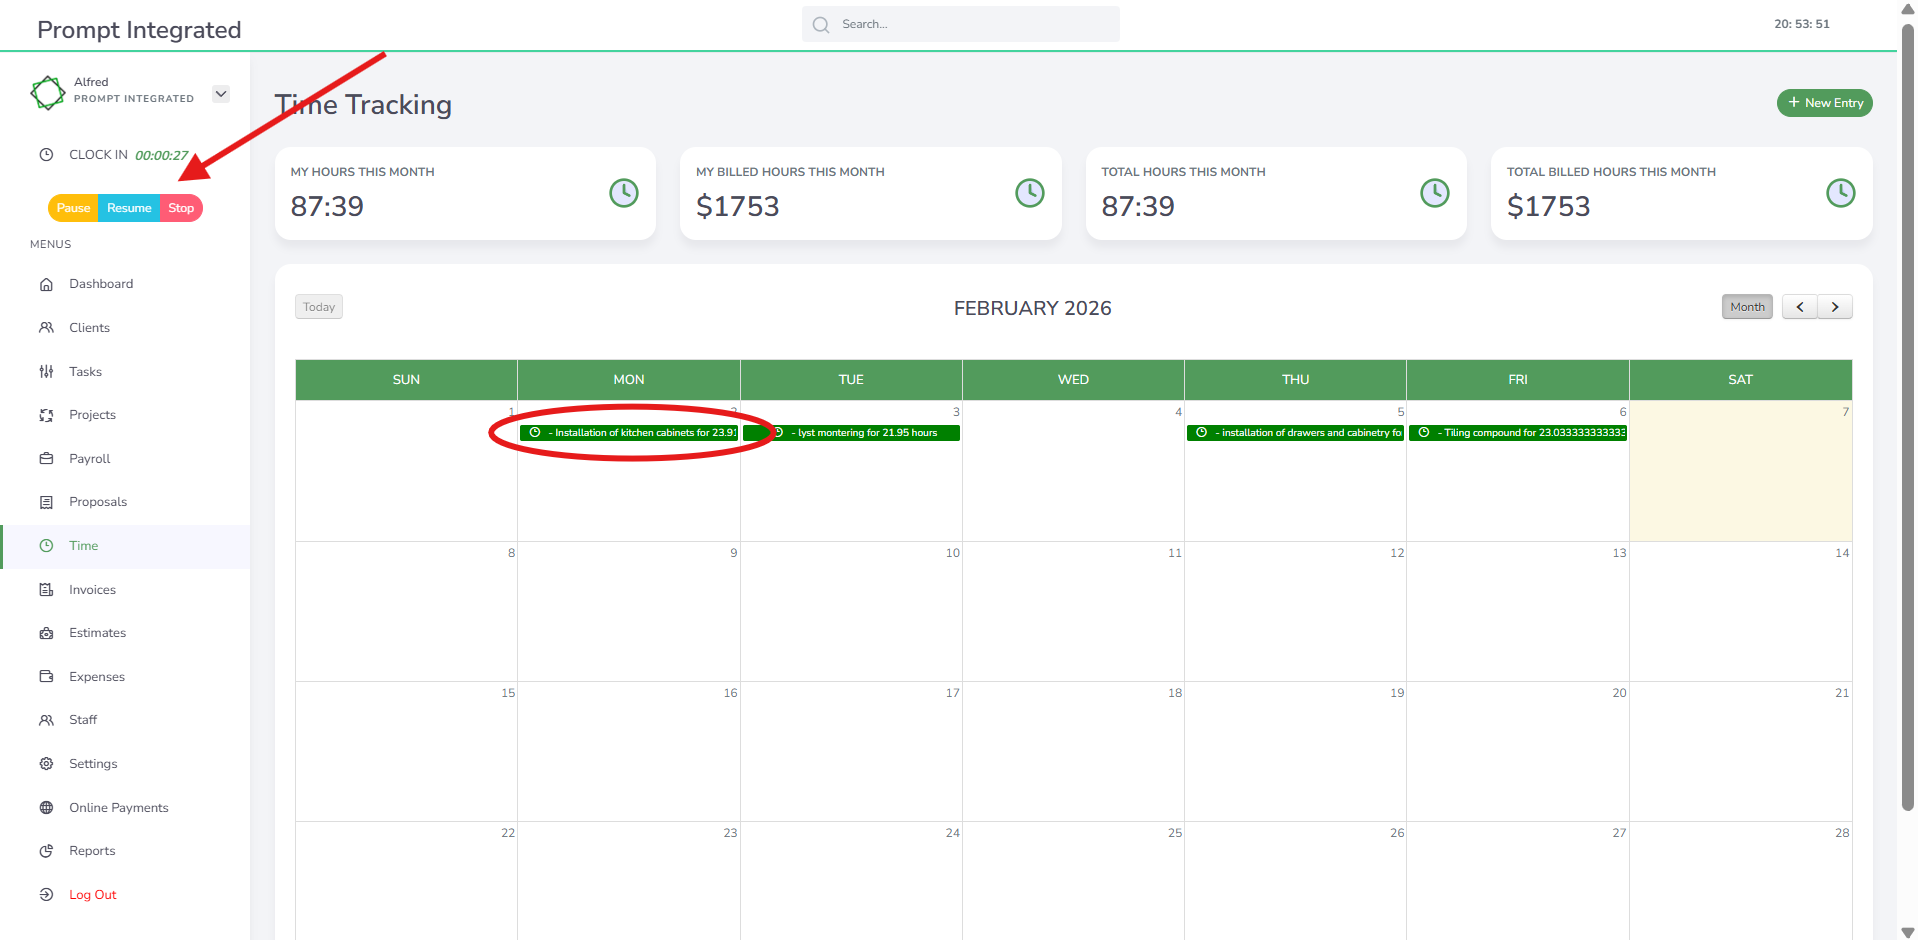

Click on project to create a new project. 
-
Enter the Project Name.
-
Select a Client and add a Project Description.
-
Choose the Due Date, Currency, and Billing Method.
-
Select Fixed or Hourly billing.
-
If Hourly, enter the Hourly Rate and Total Budget Hours.
-
Add any relevant Attachments.
-
Click Create Project.


Reports
In today’s fast-paced business environment, making informed decisions is critical to staying ahead of the competition. By leveraging powerful metrics such as sales, receivables, and revenue, you can gain deep insights into your business’s performance and identify key growth opportunities. Comprehensive business analytics provide the tools you need to transform raw data into actionable intelligence, enabling you to make strategic decisions with confidence. This seamless integration of data brings your business operations to life, offering real-time access and analysis right from the palm of your hand. Empower your growth with sophisticated analytics that not only illuminate your current standing but also guide your future success.
The Invoice Report provides a visual summary of all invoices you’ve sent throughout the year. You can quickly find specific invoices using the search function. The report highlights the number of invoices created, the total amount expected, and any outstanding balances. It also shows the current status of each invoice for easy tracking.
-

- Invoice search
-

- Invoice summary
-

- Invoice report
The Payment Report provides a visual summary of all payments made throughout the year. You can quickly find specific paid
-

- Payment overview
-

- Search overview
-

- Summary
-

- search and filter
invoices using the search function. The report highlights the number of invoices created, the total amount expected, and any outstanding balances. It also shows the current status of each invoice for easy tracking.
The Timesheet provides a visual overview of all time registered across your projects throughout the year. It shows total monthly hours, total billed hours per month, total yearly hours, and total billed hours for the year. It also breaks down hours logged for each project, including both billed time and total project hours for clear tracking.
-

- TIme sheet search
-

- TIme sheet
-

- Time sheet overview
The Expense Report provides a clear visual overview of project expenses throughout the year. It presents both the number of expenses and the total amounts in an easy-to-understand format. The report also shows the clients associated with each expense, and you can quickly find records by searching by month, year, or client name.


Income and expense reports give you a clear picture of your business’s financial performance. Total income and expenses — including payroll — are consolidated in one place, so you always know where your business stands. A pie chart breaks this down visually, while a plain-language summary makes the numbers easy for anyone to understand at a glance.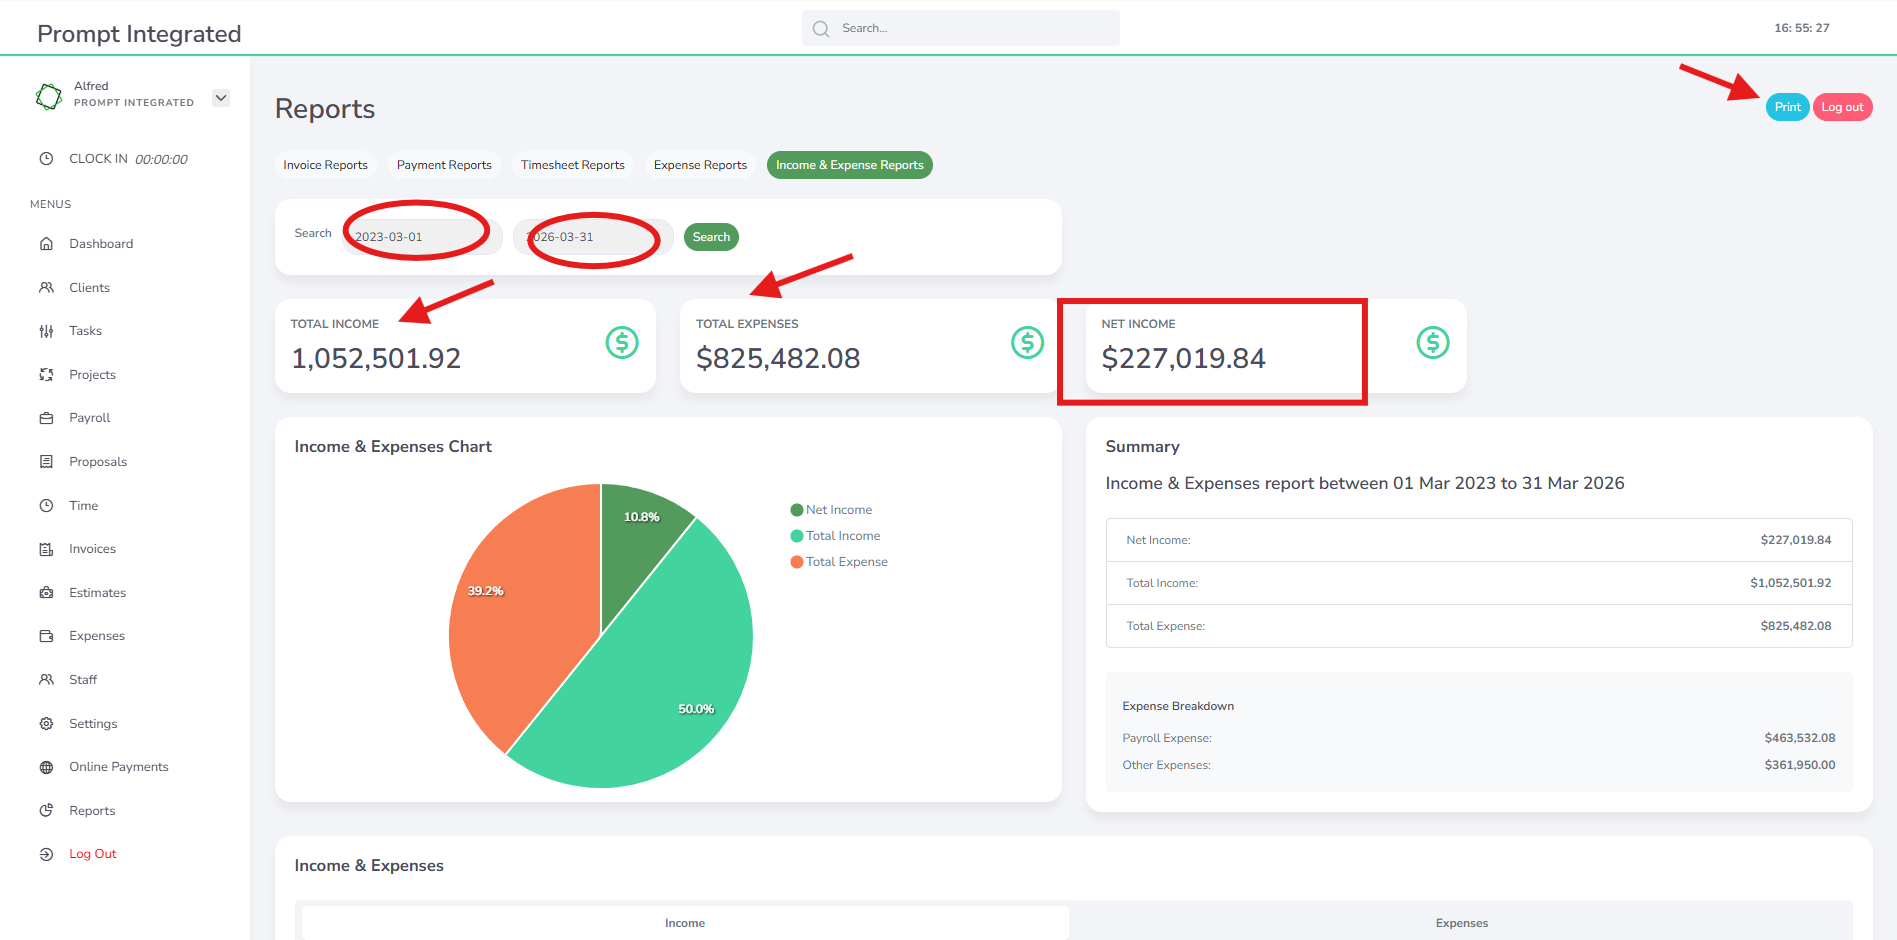
• The Payroll Report provides a clear visual overview of your payroll activities.
• View key payroll metrics, including:
-
Total payouts
-
Total deductions
-
Total salary costs
-
Total overtime costs
• Easily filter reports by month and year to find the information you need.
• Access a list of recent payroll payouts and generated payslips.
• Each payslip displays detailed information, including:
-
Salary breakdown
-
Benefits and allowances
-
Deductions
-
Net pay
• Gain workforce insights through attractive visual reports showing:
-
Gender distribution
-
Employment distribution
-
Total hours worked
• All information is presented in an intuitive and visually appealing dashboard, making payroll analysis simple and efficient.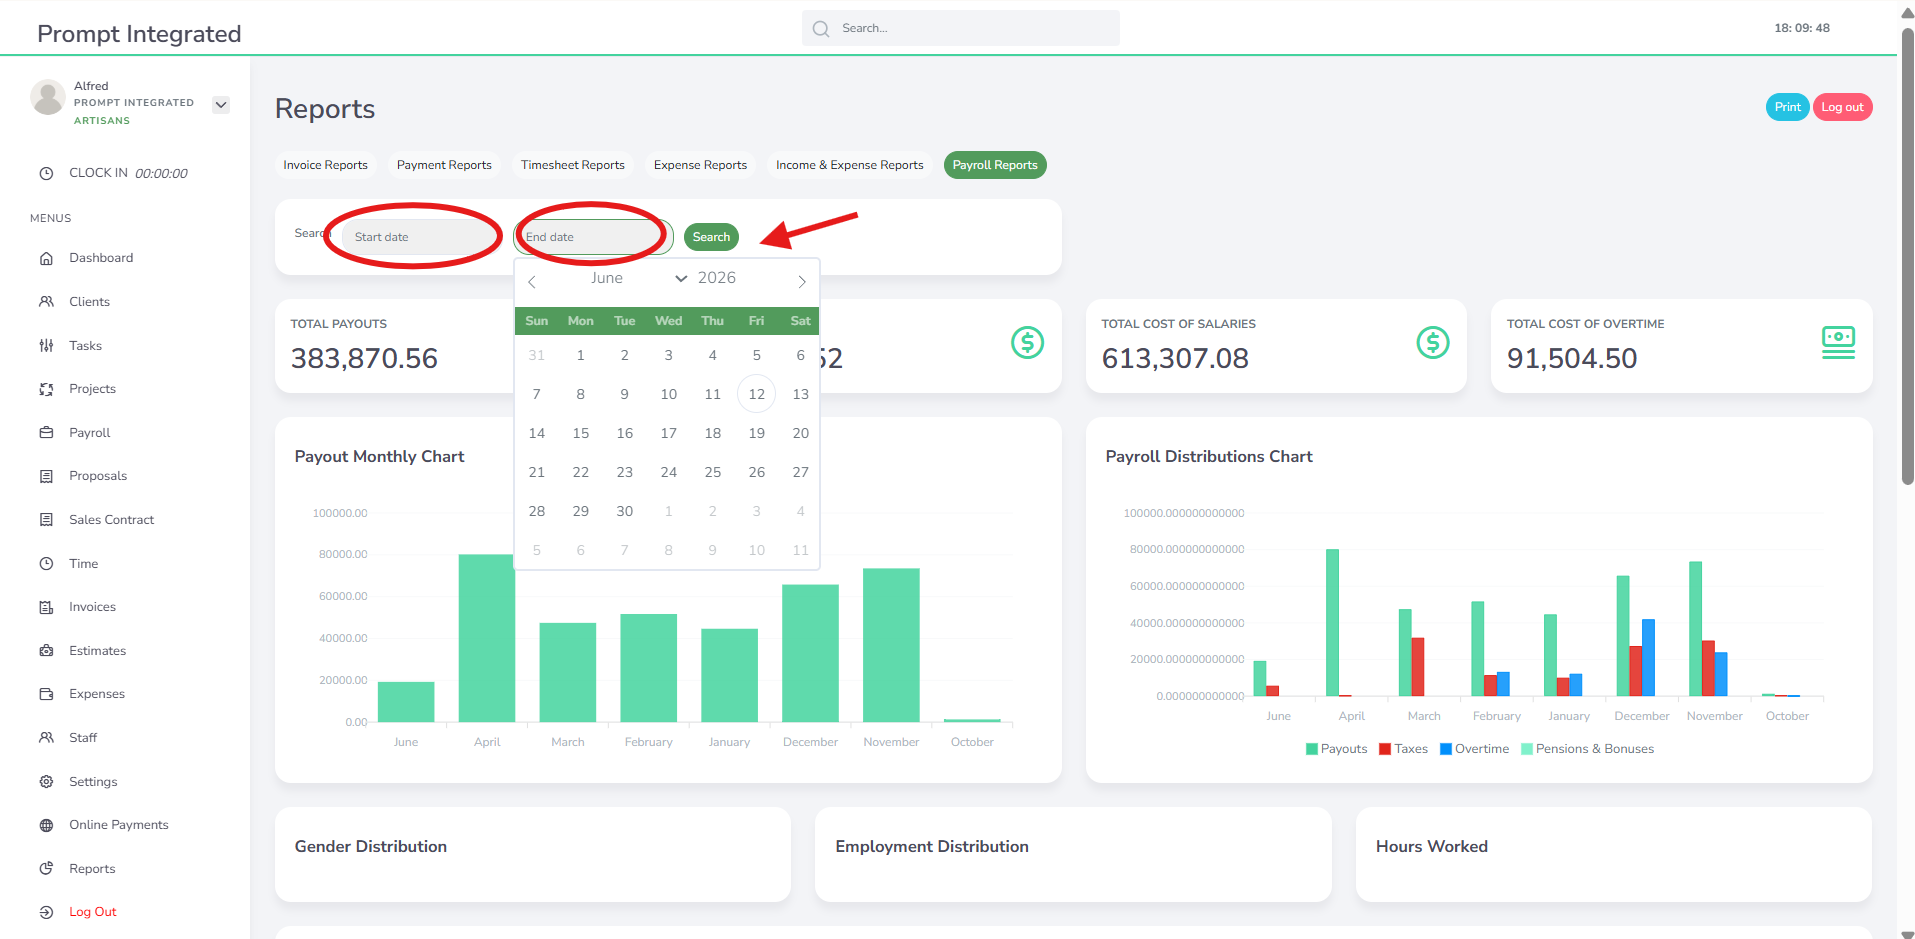


Payroll
Managing payroll can be a complex and time-consuming task, but Prompt Payroll makes it easy and efficient. With our intuitive wizard, you can seamlessly handle payslips, taxes, pensions, benefits, and notifications with a few simple clicks. Our automated system ensures accuracy and compliance, reducing the risk of errors and saving you valuable time. By simplifying these essential processes, Prompt Payroll allows you to focus on what truly matters—running your business and taking care of your employees.
The Payroll Dashboard provides a clear visual overview of total payouts, total deductions, total salary costs, and total overtime expenses. It also organizes employees, payroll creation, payroll history, and settings in a simple, easy-to-navigate layout.

Creating payroll starts by selecting your preset pay period. Once selected, all your employees appear in a single list. Each row shows key details—name, email, pay type (hourly or fixed), configured deductions, hours worked, overtime, bonuses, and other adjustments—so you can easily see and edit what you’re working on.
Your existing payroll configurations load automatically, with options to toggle additional deductions or changes as needed. By default, only GST or income tax is applied, but you’re free to customise each employee’s setup.
If employees clock in and out, their regular and overtime hours are filled in automatically. Overtime is calculated once the standard working hours you’ve set are exceeded.
After reviewing and confirming all entries, simply save and run payroll. The system handles all calculations automatically and generates payslips instantly.
-

- Set pay period
-

- Toggle for options
-

- enter hours worked
-

- Dashboard review after running payroll
Payroll history lets you access and review previously run payrolls. Simply select a payroll period and search to generate a list of payroll runs for that timeframe. To generate a payroll record, click on an employee’s name and the payroll will be created.
-

- Payroll history search period
-

- Payroll set period search
-

- Payslip
-
- Details of search
Payroll Period Settings
Register regular working hours, with the standard set to 8 hours. Define the payroll start date and end date, then save the payroll period.
Pay Frequency Settings
Select the payroll frequency (for example, semi-monthly or monthly). Then choose the wallet name and wallet key, and save your settings.


Settings
In the business settings, you can customize key details to ensure smooth operations. This includes setting your business name, contact information, and industry type, as well as uploading your business logo for brand recognition. You can also update your profile and address details, choose a theme that matches your brand, and customize invoice preferences to streamline financial processes. These settings help keep your business organized and present a professional image to clients.

Enter your business details to get started. Add key information such as your company name, email, logo, website, city, and brand colours, then proceed to regional settings.
Choose your currency, language, and document theme. Your selected invoice template will be set as the default and displayed with your logo.
Save settings and you’re ready to go.
Go to the main dashboard and click on Settings to begin the registration process. This is a three-step setup that includes Contact Information, Profile & Address, Regional Settings, and Document Theme.
Start by entering your business contact details. You can also upload your company logo and select a brand color to match your business identity.
Next, complete the Profile section by adding your basic business information, including your address and location.
Under Regional Settings, choose your preferred currency and language.
Finally, select a Document Theme, which allows you to choose the invoice template you’ll use when sending invoices to clients.

Forms (coming soon)
Our forms have the functionality that allows you to collect client data easily. With user-friendly interfaces and customizable fields, these forms can be tailored to fit the specific needs of your business. Whether you need to gather contact information, feedback, or detailed client profiles, our forms streamline the process, ensuring that the data is organized and accessible. This efficiency not only saves time but also enhances the accuracy of the information collected, enabling you to make informed decisions and improve client relationships.

